Today, I'd like to talk a bit about Azure Web Apps and how to leverage the Azure Portal to the maximum to create, manage, and monitor them effectively.
As you may have already noticed, in the title of this post, I've omitted one key verb pertaining to a successful website, i.e. 'developing it'. Without that, or if you don't do a good job building it and providing great relevant content, then there's nothing to manage or monitor. I'm going to however, reserve that topic for another day and assume you've already hacked a stunning website using the technology of your choice.
What next?
First, you want to host it and have a fancy domain name to go with it. Next, typically as you start getting traffic onto your site, you want to ensure that your site is always up and running. Also, you'd want to gain insight into how it performs out in the wild. You may like (and need?) answers to questions like the following ones:
- How many people visited the website?
- How long did they stay on the site?
- What was the target demographic?
- Which browsers were used the most?
- Did the pages load fast enough?
- Did the site go down at any point in time?
These are just a few, and I'm sure you can think of many more useful metrics. This is where Azure Web Apps integration into the portal is really useful. Lets explore each of the three areas and how to leverage the portal to effectively run your website.
Create
Creating a new web app hosting is ridiculously simple, as it should be. Hit the
 and
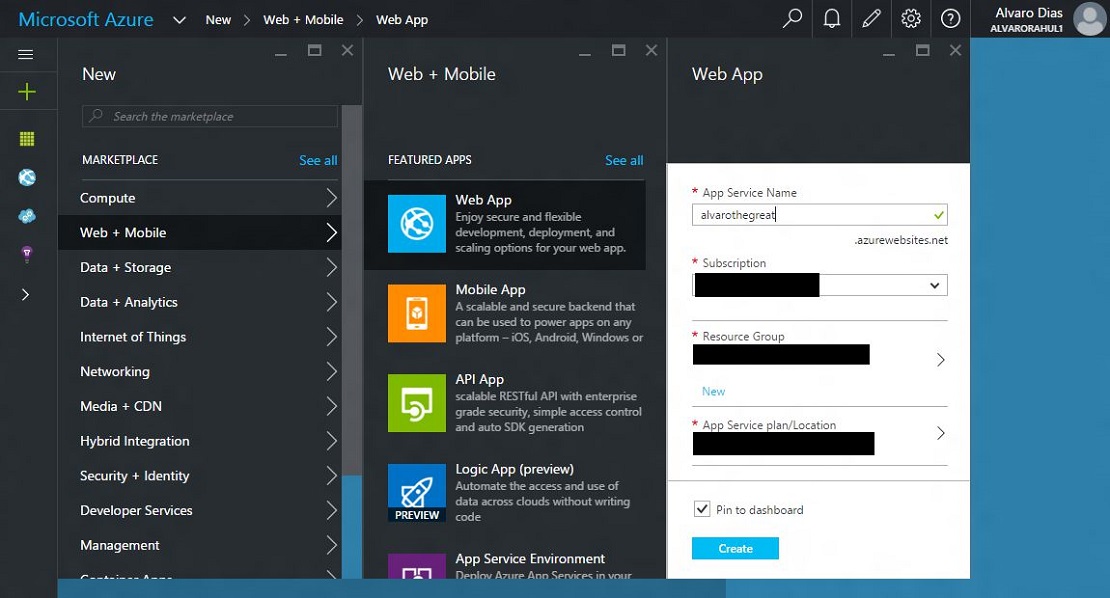
navigate to Web App under the "Web + Mobile" category.
and
navigate to Web App under the "Web + Mobile" category.
All you need to do in the form that opens up is give the name for your website and make sure that the other fields (such as subscription, location and resource group) are correctly filled in. Now hit Create.

In a very short time (most likely a few seconds, maybe a little more), you'll have a site up and running at <sitename>.azurewebsites.net.
Here's a deep link that'll take you straight to the Create form in the Azure
Portal https://portal.azure.com/#create/Microsoft.WebSite
Manage
Once you've created your site, you'll want to configure it according to your requirements. For example, the kind of processing power you need, the runtimes for web technologies you want installed on your servers, etc.
All these settings are conveniently located in the Settings blade that is opened from the Settings (⚙) command. You can find general settings, support and troubleshooting information, UI for enabling/disabling features and many more knobs to tweak your website to your satisfaction.

A whole bunch of really cool settings can be found on the 'Application settings' blade shown above. It allows you to configure turning on/off the runtimes for various web technologies (.NET, PHP, Java, Python, et.al.) that are run on the web server. Also, you can control whether other settings such as whether or not to allow web sockets and whether the site should always stay on. Finally, you'll find various IIS settings such as appSettings, default documents and virtual directories that you probably are already familiar with if you've tinkered around in IIS manager.
Also, clicking on the Tools command on the Web App blade, gives you links to a set of useful tools that let you observe and develop your website.
Monitor
Finally, now that you have your website up and running, you'll want to monitor it to get answers to questions like the ones mentioned above. I classify this into two major buckets
- uptime - to ensure that your site is running smoothly.
- analytics - to gain insights into the running of your website
Uptime - ensuring that your website is running smoothly
I like using the built-in web test functionality provided within Azure Web Apps to validate site uptime. It allows you to create simple tests such as pinging your website with relative ease. It has some really cool features such as choosing which locations to run the test from and how often to run the tests. Also you can choose criteria based on which you'll get alerts when something isn't quite right with your website.
You can add the "Web tests" tile to your website blade by opening the tile gallery (click on the 'Add a group' button at the bottom of the blade) and dragging the relevant tile onto the blade.

Once you have done that, creating a web test is as simple as filling a form to configure the kind of test you want to run.
And voila, you have some basic monitoring setup for your site. Here's what the chart for a simple ping test would look like.

Analytics - gaining insights to improve your website content, design, etc.
I like using Application Insights for this because of the seemless expereince integrating it into your website. I tried it with my ASP.NET project. Getting server-side performance and usage analytics was as simple as adding the SDK to my ASP.NET project. And usage analytics for web pages was achieved by adding a tiny JS snippet into my web pages.
This documentation gives more in-depth information on configuring Application Insights in your application: https://azure.microsoft.com/en-us/documentation/articles/app-insights-get-started/
I've done this for http://alvarodias.org and am pretty happy with the state I'm in. Below is the Azure Portal dashboard I'm currently using to monitor my website.

It contains the things I care most about my website such as traffic by browser, traffic by country, the working set, network and response times. It also contains statuses of web test I run on my web app to ensure it is running smoothly. And one tile estimating my spend.
For more info on customizing your dashboard, do read this post.
Thats's all for today. Now go create a website and have fun!
